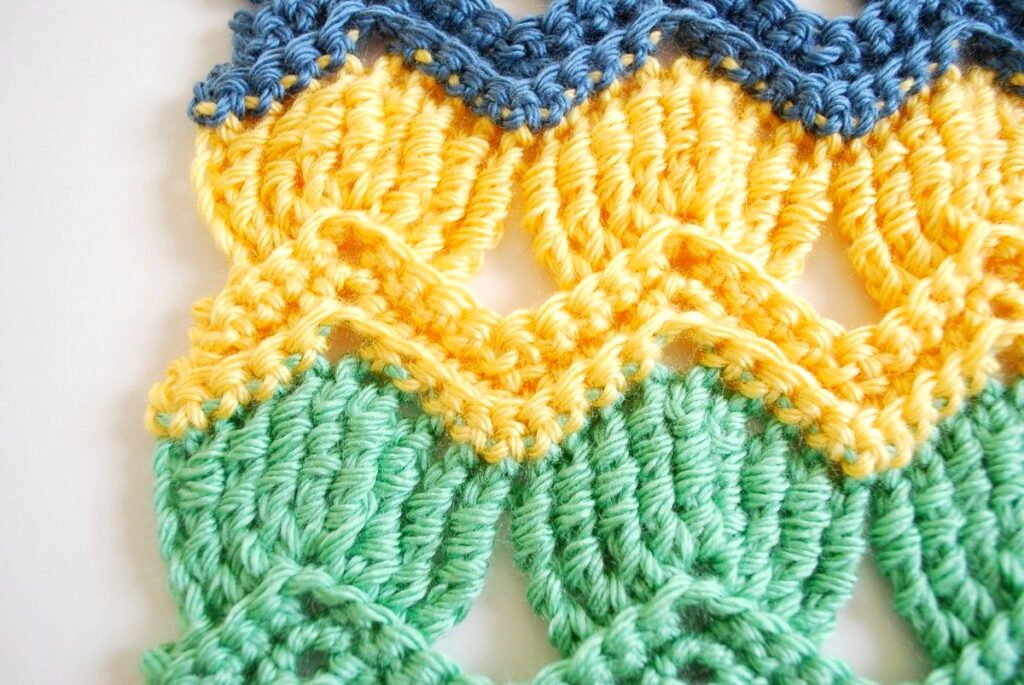
The Vintage Fan Ripple Stitch is a beautifully textured crochet stitch that creates a classic lace-like wave pattern. This elegant design is perfect for making blankets, shawls, scarves, and decorative home accessories. The combination of fan motifs and rippling waves gives this pattern a vintage aesthetic, making it a favorite among crocheters who enjoy intricate yet rhythmic stitching.
Materials Needed:
To work on this pattern, you will need the following materials:
- Yarn: Choose any type of yarn that suits your project. A lighter yarn like cotton or acrylic works well for delicate shawls, while a thicker yarn like wool, is great for warm blankets.
- Crochet Hook: Use a hook size appropriate for your yarn choice. The recommended size is usually indicated on the yarn label.
- Scissors: To cut your yarn when finishing.
- Tapestry Needle: For weaving in the ends.
- Stitch Markers (Optional): Helps keep track of stitch repeats.

Abbreviations (US Terms):
Before starting, familiarize yourself with the common abbreviations used in this pattern:
- ch – chain
- sc – single crochet
- dc – double crochet
- tr – treble crochet
- sl st – slip stitch
- st(s) – stitch(es)
- rep – repeat
- sk – skip
Pattern Instructions:
This pattern is worked in a multiple of 12 + 3 chains to maintain the ripple effect. You can adjust the width of your project by increasing or decreasing the number of starting chains.
Foundation Row:
- Create a slip knot and chain a multiple of 12 + 3 (for example, 36 + 3 = 39 chains).
Row 1:
- Work 1 dc in the 4th chain from the hook (this counts as 2 dc).
- 1 dc in the next 3 chains (total of 4 dc).
- Sk 2 chains (this creates the dip in the ripple).
- 1 dc in each of the next 4 chains.
- (3 dc in the next chain) – This creates the fan’s peak.
- Repeat steps 2-5 across the row, ending with 2 dc in the last chain.
- Turn your work.
Row 2:
- Ch 3 (counts as first dc).
- 1 dc in each of the next 3 dc.
- Sk 2 dc, then 1 dc in each of the next 4 dc.
- (3 dc in the next dc – fan peak stitch).
- Repeat across the row, ending with 2 dc in the turning chain.
- Turn your work.
Row 3 and Beyond:
- Continue repeating Row 2 until you reach your desired length.
- Fasten off and weave in ends.
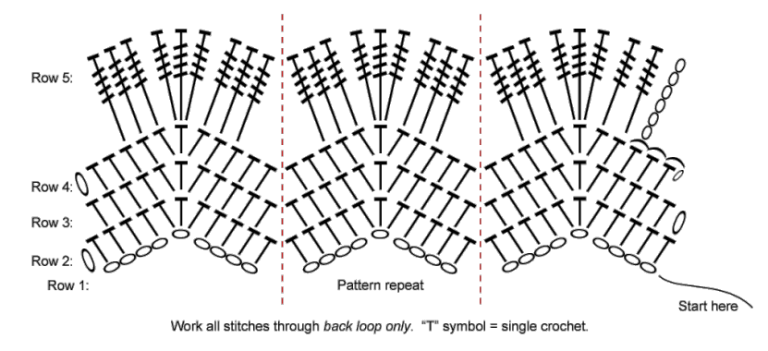
Vintage Fan Ripple Stitch – CHART

Vintage Fan Ripple Stitch – PDF
Dear reader, if you prefer to have a PDF version to print, we have your solution here! Here is the PDF with the Vintage Fan Ripple Stitch tutorial made by Janis Cortese. You can access it below:
Customization Ideas:
This versatile stitch pattern can be adapted to various projects. Here are some ways to modify it:
- Color Changes: Switch colors at the beginning of a new row for a striped effect.
- Texture Variation: Use front post and back post stitches to enhance the ripple depth.
- Lace Effect: Increase chain spaces between stitches for a more delicate, airy look.
- Edging: Add a scalloped or picot edge for a finished look.
Common Mistakes and Fixes:
- Uneven Waves: Ensure stitch counts are accurate and maintain tension consistently.
- Curling Edges: Blocking your finished piece can help flatten ripples.
- Gaps in Pattern: Tighten stitches and check for skipped or misplaced stitches.
- Lost Ripple Effect: Adjust chain count if necessary to maintain the wave structure.
Project Ideas Using the Vintage Fan Ripple Stitch:
- Blankets: Create cozy afghans by using chunky yarn for added warmth.
- Scarves & Shawls: Use lightweight yarns for a delicate and elegant drape.
- Table Runners & Doilies: Incorporate fine cotton thread for intricate home decor.
- Clothing: Add this stitch as an accent in cardigans or summer tops.
VIDEO TUTORIAL:
If you’re looking to master the Vintage Fan Ripple Stitch through a visual guide, here’s a highly recommended YouTube tutorial:
This tutorial offers a clear, step-by-step demonstration, making it easier to follow along and perfect your technique.
Final Thoughts:
The Vintage Fan Ripple Stitch is a timeless and rewarding crochet pattern that blends elegance with simplicity. Whether you’re making a cherished heirloom or a quick decorative piece, this stitch offers a balance of beauty and functionality. Experiment with colors, textures, and variations to create a truly unique project!
Happy Crocheting! 🧶


