How to Crochet a Classic Granny Square – A Step-by-Step Guide
The granny square is one of the most well-loved and timeless crochet patterns, used for everything from blankets and scarves to bags and even clothing. Its versatility, simplicity, and beautiful design make it a favorite among beginners and experienced crocheters alike. If you’ve ever wanted to learn how to crochet a granny square, this guide will walk you through each step in detail.
What is a Granny Square?
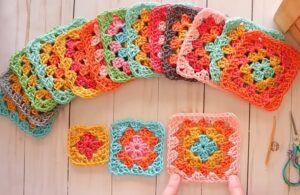
A granny square is a square-shaped crochet motif made by working in rounds from the center outward. The design typically consists of groups of double crochet stitches separated by chain spaces, creating a lacy, textured look. The most traditional granny square features four corners, allowing for easy expansion to any size.
Granny squares can be used as standalone motifs or stitched together to create larger projects such as blankets, cushion covers, shawls, and even sweaters. They can be made in a single color or multiple colors for a vibrant patchwork effect.

Materials Needed
To crochet a basic granny square, you’ll need the following materials:
- Yarn: Any type of yarn can be used, but worsted-weight or DK-weight yarn is best for beginners. Cotton, acrylic, or wool yarns all work well, depending on the final use of your project.
- Crochet Hook: Choose a hook size that matches your yarn. If using worsted-weight yarn, a 4mm to 5mm hook is recommended.
- Scissors: Trim your yarn after completing your square.
- Tapestry Needle: For weaving in loose ends.
Step-by-Step Instructions
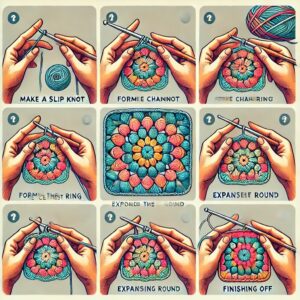
Step 1: Making the Foundation Ring
- Start with a slip knot on your hook.
- Chain 4 stitches (or 5 for a looser center).
- Insert your hook into the first chain (the one closest to the slip knot) and slip stitch to form a ring.
- You now have a small circle, which will serve as the center of your granny square.
Alternative: Instead of chaining 4, you can start with a magic ring, which allows you to pull the center tight for a neater look.
Step 2: Round 1 – Creating the First Layer
- Chain 3 (this counts as your first double crochet).
- Work 2 double crochets into the ring.
- Chain 2 (this forms the first corner).
- Repeat the following three more times:
- 3 double crochets into the ring.
- Chain 2 (for the corner).
- After the fourth set of 3 double crochets, join with a slip stitch to the top of the beginning chain-3.
At this point, your work should look like a small square with chain spaces at each corner.
Step 3: Round 2 – Expanding the Square
- Slip stitch into the next 2 stitches to reach the first chain-2 corner space.
- Chain 3 (counts as first double crochet).
- Work 2 double crochets, chain 2, and 3 double crochets into the same corner space (this forms a new corner).
- Move to the next corner space and repeat: 3 double crochets, chain 2, 3 double crochets.
- Continue this pattern around the square, working 3 double crochets, chain 2, and 3 double crochets into each corner space.
- Join with a slip stitch to the top of the initial chain-3.
At the end of Round 2, your square will have grown, with larger corners forming its shape.
Step 4: Round 3 and Beyond – Growing the Square
For each additional round, follow these general steps:
- Slip stitch into the next stitches to reach the nearest chain-2 corner space.
- Chain 3 (counts as first double crochet).
- Work 2 more double crochets, chain 2, and 3 double crochets into the same corner space.
- Now, for each side section:
- Work 3 double crochets into the spaces between clusters from the previous round (these are the chain spaces between double crochet groups).
- When you reach a corner, repeat (3 double crochets, chain 2, 3 double crochets) in the chain-2 space.
- Continue this pattern around, joining the round with a slip stitch.
Each round increases the size of the square while maintaining the same basic structure. The more rounds you add, the larger the square becomes.
Step 5: Finishing Off
Once your granny square is the desired size, follow these steps to finish:
- Cut the yarn, leaving a 5–6 inch tail.
- Pull the yarn through the last loop on your hook to fasten off.
- Use a tapestry needle to weave loose ends along the back of the square.
If you’re making multiple granny squares, repeat the process with different colors or yarns, then join them together using methods such as slip stitch, single crochet, or whip stitch.

Tips for a Perfect Granny Square
- Keep an even tension: If your square looks wobbly, check that you’re not pulling too tightly or loosely.
- Use a stitch marker: If you’re a beginner, placing a stitch marker at the start of each round can help keep track of where to join.
- Change colors for variety: To switch colors, fasten off at the end of a round and join a new yarn color in any corner space.
- Block your squares: If your granny square curls, dampen it slightly and pin it to a flat surface to shape it properly.
What Can You Make with Granny Squares?
Granny squares are extremely versatile, and you can create a variety of items, such as:
- Blankets – Join multiple squares to make a cozy throw or bedspread.
- Cushion Covers – Sew squares together to create a decorative pillowcase.
- Tote Bags – A simple square bag made from granny squares is trendy and practical.
- Cardigans & Sweaters – Fashion designers love using granny squares for patchwork-style clothing.
- Coasters & Placemats – A small granny square makes a perfect coaster.
The possibilities are endless!
Video Tutorial:
If you’re looking for a visual guide to crocheting a granny square, here’s a highly recommended tutorial:
This tutorial is perfect for beginners, guiding you through each step of creating a classic granny square. Happy crocheting!
Final Thoughts
The granny square is an essential crochet technique that’s easy to learn and fun to experiment with. Whether you make a single square or an entire blanket, this timeless pattern allows for creativity and endless customization. By following these simple steps, you’ll be able to crochet a perfect granny square in no time.
Now grab your yarn and hook, and start stitching!


