How to Create the Granny Spike Stitch: A Step-by-Step Guide
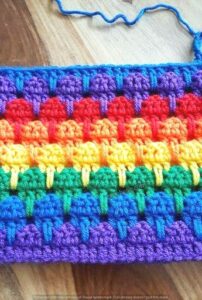
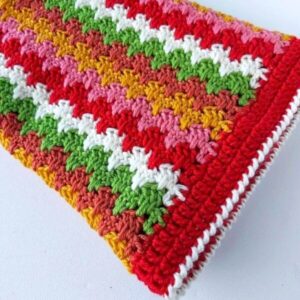
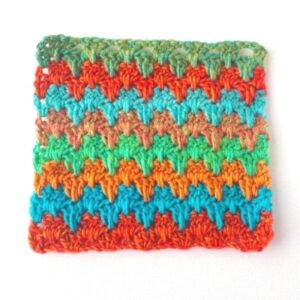
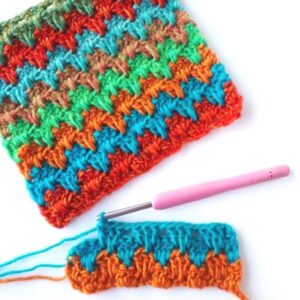
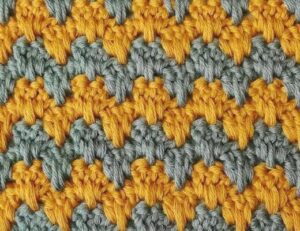
The Granny Spike Stitch is a striking variation of the classic granny stitch, where elongated double crochet stitches (spike stitches) are inserted into previous rows. This creates a zigzag or jagged effect, adding texture and depth to your crochet projects. The pattern is highly adaptable, making it ideal for blankets, scarves, cushions, and even garments.
This guide will walk you through everything you need to know, from materials to step-by-step instructions, tips for color changes, and troubleshooting common mistakes.
Materials Needed
To get started, you’ll need the following:
- Yarn: Any weight of yarn will work, but worsted weight (Category 4) or DK (Category 3) are commonly used.
- Crochet Hook: Choose a size that complements your yarn (check the yarn label for recommendations).
- Scissors: For cutting yarn when changing colors or finishing off your project.
- Tapestry Needle: Useful for weaving in loose ends.
Understanding Basic Stitches and Abbreviations
Before diving into the pattern, it’s essential to familiarise yourself with some key crochet terms:
- ch – chain
- dc – double crochet (US terminology)
- spike dc – spike double crochet (a long dc worked into a previous row)
- sk – skip
- st(s) – stitch(es)
- sp – space
- beg ch-3 – beginning chain 3 (counts as a double crochet)
Note: This pattern follows US crochet terminology. If you’re using UK terms, replace double crochet (dc) with treble crochet (tr).
Step-by-Step Instructions
Step 1: Creating the Foundation Chain
To begin, you’ll need to make a foundation chain in multiples of 3 + 2. This ensures that the pattern repeats evenly.
For example:
- Small swatch: 26 chains (24 + 2)
- Medium project: 50 chains (48 + 2)
- Large blanket: 152 chains (150 + 2)
Step 2: First Granny Stitch Row (Row 1)
- Work into the 5th chain from the hook (this counts as the first DC).
- Skip 2 chains, and work 3 dc into the next chain.
- Repeat step 2 across the row until you reach the last 3 chains.
- Skip 2 chains, work 1 dc into the last chain.
- Turn your work.
At the end of this row, you should see clusters of three double crochets with spaces between them. These spaces are where you’ll be placing your stitches in the following rows.
Step 3: Second Row (Spike Stitch Row)
- Ch 3 (counts as first dc).
- Skip the first 2 dc, then insert your hook into the space between the clusters of the previous row (one row below the usual working row).
- Work 1 spike DC (yarn over, insert the hook into the lower space, pull up a long loop to match the height of your row, yarn over and pull through 2 loops, yarn over and pull through the final 2 loops).
- Work 2 more DCs into the same space to complete a granny cluster.
- Skip the next 3 dc, then work (1 spike dc + 2 dc) in the next space.
- Repeat this pattern across the row, ending with 1 dc at the top of the turning ch.
- Turn your work.
After completing this row, you’ll see the spike stitches creating a dynamic texture.
Step 4: Continuing the Pattern
To build your project, continue alternating between:
- A regular granny stitch row (clusters of 3 dc in each space).
- A spike stitch row (1 spike DC + 2 DC per cluster space).
This creates a fabric with a visually appealing zigzag effect.
Changing Colours for a Striped Effect
To enhance the appearance of the Granny Spike Stitch, consider changing colors every 2–4 rows. Here’s how:
- At the end of the last stitch of a row, stop before the final yarn is over.
- Drop the old color and pick up the new color, pulling it through the last two loops.
- Ch 3 with the new color, then continue as normal.
- Carry the unused yarn up the side or weave in ends for a cleaner finish.
This technique results in a neat and seamless color transition.
Tips for Perfecting the Granny Spike Stitch
1. Keep Consistent Tension
Spike stitches need a slightly looser tension to maintain an even fabric. If they are too tight, they may pull the work downward, distorting the shape.
2. Count Your Stitches
Misplacing a stitch can shift the pattern. Always check that each row has the correct number of granny clusters.
3. Block Your Work
Blocking your finished project will help even out stitches and enhance the definition of the spike pattern.
4. Experiment with Colours
Using contrasting shades makes the spike stitches stand out more. Try alternating between dark and light hues for a bold effect.
5. Adjusting the Length of the Spike Stitch
For more variation, you can work spike stitches into different depths, creating a staggered effect. Try inserting some spikes into the row two rows below instead of just one row below.
Common Mistakes and How to Fix Them
1. Uneven Spike Stitches
If some spike stitches appear too tight or too loose, adjust how much you pull up the loop when making the stitch.
2. Crooked Edges
To keep straight edges, always work the final dc into the top of the turning ch.
3. Gaps Between Stitches
If gaps seem too large, try using a smaller hook size or slightly tightening your tension.
4. Confusion About Where to Place the Spike Stitch
Remember, spike stitches should be worked into the space between granny clusters of the previous row, not into individual stitches.
Variations of the Granny Spike Stitch
1. Extra Deep Spike Stitch
For a more dramatic effect, insert the hook two or even three rows below instead of just one row below.
2. Solid Granny Spike Stitch
Instead of traditional granny clusters, you can work 2 DC, 1 spike DC, and 2 DC into each space, creating a denser fabric.
3. Mini Granny Spike Stitch
Using half-double crochet (hdc) instead of double crochet makes a smaller, tighter version of this stitch, perfect for baby blankets or garments.
Video Tutorial
Dear crocheter friend, if you learn faster by watching this pattern on video, we recommend the
tutorial from the Blossom Crochet channel. you can see the video here below
Final Thoughts
The Granny Spike Stitch is an excellent choice for adding texture and dimension to crochet projects. Whether you’re making a blanket, a scarf, or a cushion cover, this stitch offers both structure and visual interest.
Would you like suggestions for specific projects using this stitch? Or perhaps a border idea to finish off your work neatly?


